I have had some people ask about our Ninjago party invites and decorations. I got some of our ideas from this blog:
http://zoltybalonik.blogspot.com.
I also found most of the other stuff off of Google/images. I hope this helps you in your Ninjago party. I would love to see pictures and hear all about your party!!!!
Thursday, August 30, 2012
Wednesday, August 29, 2012
A Little Note for the First Day of School
This year, my kids are in third grade and first grade (where does the time go). My daughter was not looking forward to going to school this year. She just wanted to "stay home with mommy" (I wish she could to, but I can't tell her that). Anyway, to make her transition from summer to first grade a little better and to help get rid of some of the jitters, I made a little note that she could keep in her backpack. This is what it looked like:

I put a kiss on the note and put it in the front part of her bag. I showed her where it was in case she needed it.
When she came home on the first day, she told me that she went to her bag and gave the note a kiss so she could "get a kiss from mommy!" I about melted!!! Mission accomplished and many great, first grade days ahead!
Sunday, August 19, 2012
Lego Ninjago Birthday Party
My son is turning nine at the end of this month and it is all about Lego Ninjago this year! Now, I am in the process of planning a Ninjago party. I have found that it is not the easiest party to plan. I have been looking online for some ideas, but haven't seen tons of them out there. I will be posting our party preparations to hopefully give all the die-hard Ninjago fans out there, some ideas. The first thing I did was buy some white foam board. I used a projector and blew up some pictures of different Ninjago figures. I traced them onto the foam board and colored them. I thought these would make a BIG impression at the party!


For the take home bags, I had to get a little creative. We headed to the $1 store to see what we could find. The first thing we found were "jointed" snakes or "Serpentines" as we were going to refer to them for this party (there were 4 in a bag). We also found bags of rubber "Serpentines". We also got swirly straws because I thought they looked like snakes. To make them even more "Ninjago" related, I printed off these snakes I found online (web address is below the picture) and put them on the straws.

We also found these "discs" on clearance at Michaels. We thought that they looked like Ninjago Shurikens. SCORE! We also wrapped Hersheys bars with green construction paper and glued some of the yellow eyes to the outside (I forgot to take a picture of that).

My husband printed off this cute "Happy Birthday" banner! He laminated them so they looked like I bought them somewhere. Many of the parents asked where I found the banner.


We made a laminated "place mat" for each guest. They took these home at the end of the party.

We hired a karate instructor to come in and show the boys some ninja moves. This was a huge success!

We also had a huge blow-up joust. The boys picked a Ninjago character to be and "battled" each other on the joust.
Some Ninjago food ideas:


We also printed off some yellow eyes to add to different Ninjago colored balloons.

I printed off some Ninjago eyes to use for different decorations and things (take home bags, balloons, etc.). For the take home bags, I just cut out the eyes and glued them on the front. I bought these little green sacks (my son is really liking the new green ninja) for 25 cents at Toys R Us. I liked them because they weren't too big so I don't feel like I have to buy so much to fill them!

There was also an empty Ninjago display at Toys R Us. I asked the manager if I could have it and he said yes! Score! It will come in handy for some tabletop decor!


For the take home bags, I had to get a little creative. We headed to the $1 store to see what we could find. The first thing we found were "jointed" snakes or "Serpentines" as we were going to refer to them for this party (there were 4 in a bag). We also found bags of rubber "Serpentines". We also got swirly straws because I thought they looked like snakes. To make them even more "Ninjago" related, I printed off these snakes I found online (web address is below the picture) and put them on the straws.
 |
| http://zoltybalonik.blogspot.com/2011/07/ninjago-zoty-balonik.html |


We made a laminated "place mat" for each guest. They took these home at the end of the party.

We hired a karate instructor to come in and show the boys some ninja moves. This was a huge success!

We also had a huge blow-up joust. The boys picked a Ninjago character to be and "battled" each other on the joust.
 |
| The boys were able to use these huge gloves, or they had long, padded "jousting" sticks to use. The boys loved this activity. |
Some Ninjago food ideas:
 |
| Fushi (fake sushi) - the base is Rice Krispie Treat cut into an oval. On top, Sweedish Fish and they are wrapped with Fruit by the Foot Roll Ups For this party (since we are having it outside our house), I wanted to make cupcakes. This cupcake design was the easiest thing ever. Out of all the cakes and cupcakes I have made over the years, this one was the best - so EASY!  
I made chocolate and white cupcakes. I frosted some blue (Jay) and some green (Lloyd). I then took yellow fondant and rolled it out and cut oval shapes out of it. I took a black writing frosting tube and created the black eyes on the fondant. So easy! Viola - Lego Ninjago cupcakes.
 I also made some white chocolate covered pretzels to represent the bones of Bonezai.
I hope some of these ideas help with your NInjago party. I would love to hear about your parties as well!!
|
Thursday, August 16, 2012
Fun Fruit Snack Idea for Kids
I thought this would be a fun snack for the kids. It is also a great way for them to try a variety of fresh fruit at their own discretion. I cut up different fruits on a cutting board (I had peaches, kiwi, bananas, apples and oranges). I handed each child a skewer. I told them to help themselves and skewer the fruit they wanted to try. Some kids ate fruit that they didn't think they liked! Gabrielle didn't think she liked kiwi, but she liked it during this snack! Sometimes, I think when kids are able to help themselves and try things at their own will, they are more willing to "accept" it.


Sunday, August 12, 2012
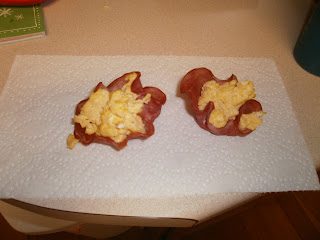
Kids New Favorite Breakfast!!
I had to blog this because after I made these, my kids keep asking me to make them again and they are so easy!!!
I took sliced ham (I had some 99% fat free deli ham in my freezer I wanted to use up) out of the package and patted them dry with a paper towel (I didn't want all the excess water in the cups). I put each slice inside a muffin pan. I maneuvered them so they looked like cups. I baked them at 350 degrees for about 10-15 minutes (until they were a little crispy).

Then, I scrambled some eggs in a pan on the stove. When the "cups" came out of the oven, I filled them with the scrambled eggs. I put them back in the oven for about 5 minutes (you don't want the eggs to dry out) and then served them. The kids loved picking up their "egg cups" and eating them like muffins! You could mix cheese and veggies in with your eggs. You could sprinkle cheese on the top of your eggs when you put them back in the oven. I am sure there are endless ways to do these cups. I would love to hear what you did with yours! This was such an easy, inexpensive and pretty healthy breakfast. One that I am sure I will be making again and again!

Saturday, August 11, 2012
Summer Alphabet Hunt
This summer, we set out to try and find the entire alphabet in nature! We had the funnest time doing it and we came up with some "creative" letters!!! I printed these pictures off and put them in a plastic photo book so each child had their own alphabet book! It was a great memento to remember our summer adventures!
Check out our letter finds!


Check out our letter finds!


Subscribe to:
Posts (Atom)