
Sunday, December 16, 2012
Classmate Christmas Gifts
Each holiday, I try to put something inexpensive together for my kids to take in and hand out to their classmates. This year for Christmas, they are going to be giving their friends a box of crayons. I think it is about that time of year when the kids are starting to lose a lot of their crayons or they are broken. And, I think nothing beats a new box of crayons! ;0) Anyway, a few months back, Toys R Us had the crayons on sale for 25 cents a box! I stocked up! I bought enough for each classroom and then a few extra to have on hand for my kids. So, all it cost me for the gifts for two classrooms was $9.25! That is a deal. I wrapped them up and then added a little tag that said: "Have a bright and colorful Christmas!:

Reuse Bath and Body Works Shipping Box as Cute Gift Box
I am loving the large checkered/gingham pattern on the Bath and Body Works store bags. But, when I got a box from them in the mail the other day (I made an order online) I was happily surprised! I opened the plain brown box to find that the inside of the box was the same pattern in red!! I had to use this for a gift box. I cut one side of the box and then taped it back together (inside out, so the gingham was now the outside of the box) and then I put the entire box together. I put the gift inside, taped it up and added some ribbon! The box is so cute all on it's own - no wrapping paper! Great way to reuse the box to and save on wrapping paper!


Happy Wrapping!!!

 |
| Cut one side of the box so it is flat like this and then you can easily put it back together so the pattern is on the outside. |
 |
| I taped this edge that I cut, back together and then just put the box together. |

 |
| Added some ribbon and viola! |
Monday, December 10, 2012
Homemade Burlap Stocking
I love the look of the old, rustic, cottage decor and I don't find a lot of it where I live. Sometimes when I get inspired, I try to see if I can do it myself! So, I wanted some cottage looking stockings and decided to make some. I had some burlap (love the look of this stuff!!!) and some yarn. I cut out the shape and then stitched it together using yarn. I put this in my Etsy shop as well! Check it out!https://www.etsy.com/listing/117747355/homemade-burlap-stocking
Homemade Vintage Wood Spool Garland
I have had these old, wooden spools for awhile now. I love the look of them and just wanted to wait to find the right thing to do with them! Then, Christmas decorating started and I became inspired! I started threading them on some heavy twine and voila..... a rustic/cottage looking garland! I put it in my Etsy shop. Check it out! https://www.etsy.com/listing/117746927/homemade-old-wood-spool-garland-1020
Monday, December 3, 2012
7 Year Old's "Painting" Birthday Party Ideas
My daughter is turning 7 at the end of this month. She is such a "crafty" little girl and loves anything that has to do with being creative. So, we are going to have her party at our local pottery store. The kids can paint a piece of clay and then they will get fired. For her invitation, we had to come up with something "creative" so we saw a picture online and came up with this:
I planned this party for 1.5 hours. I didn't know how long the girls would paint and I didn't want a lot of "extra" time because they couldn't really play in the pottery place. The girls painted for almost the entire time. We handed out some snacks and then cupcakes towards the end and Gabrielle was still opening presents when parents arrived to pick up! All in all it was a successful party and one that Gabrielle was happy with!
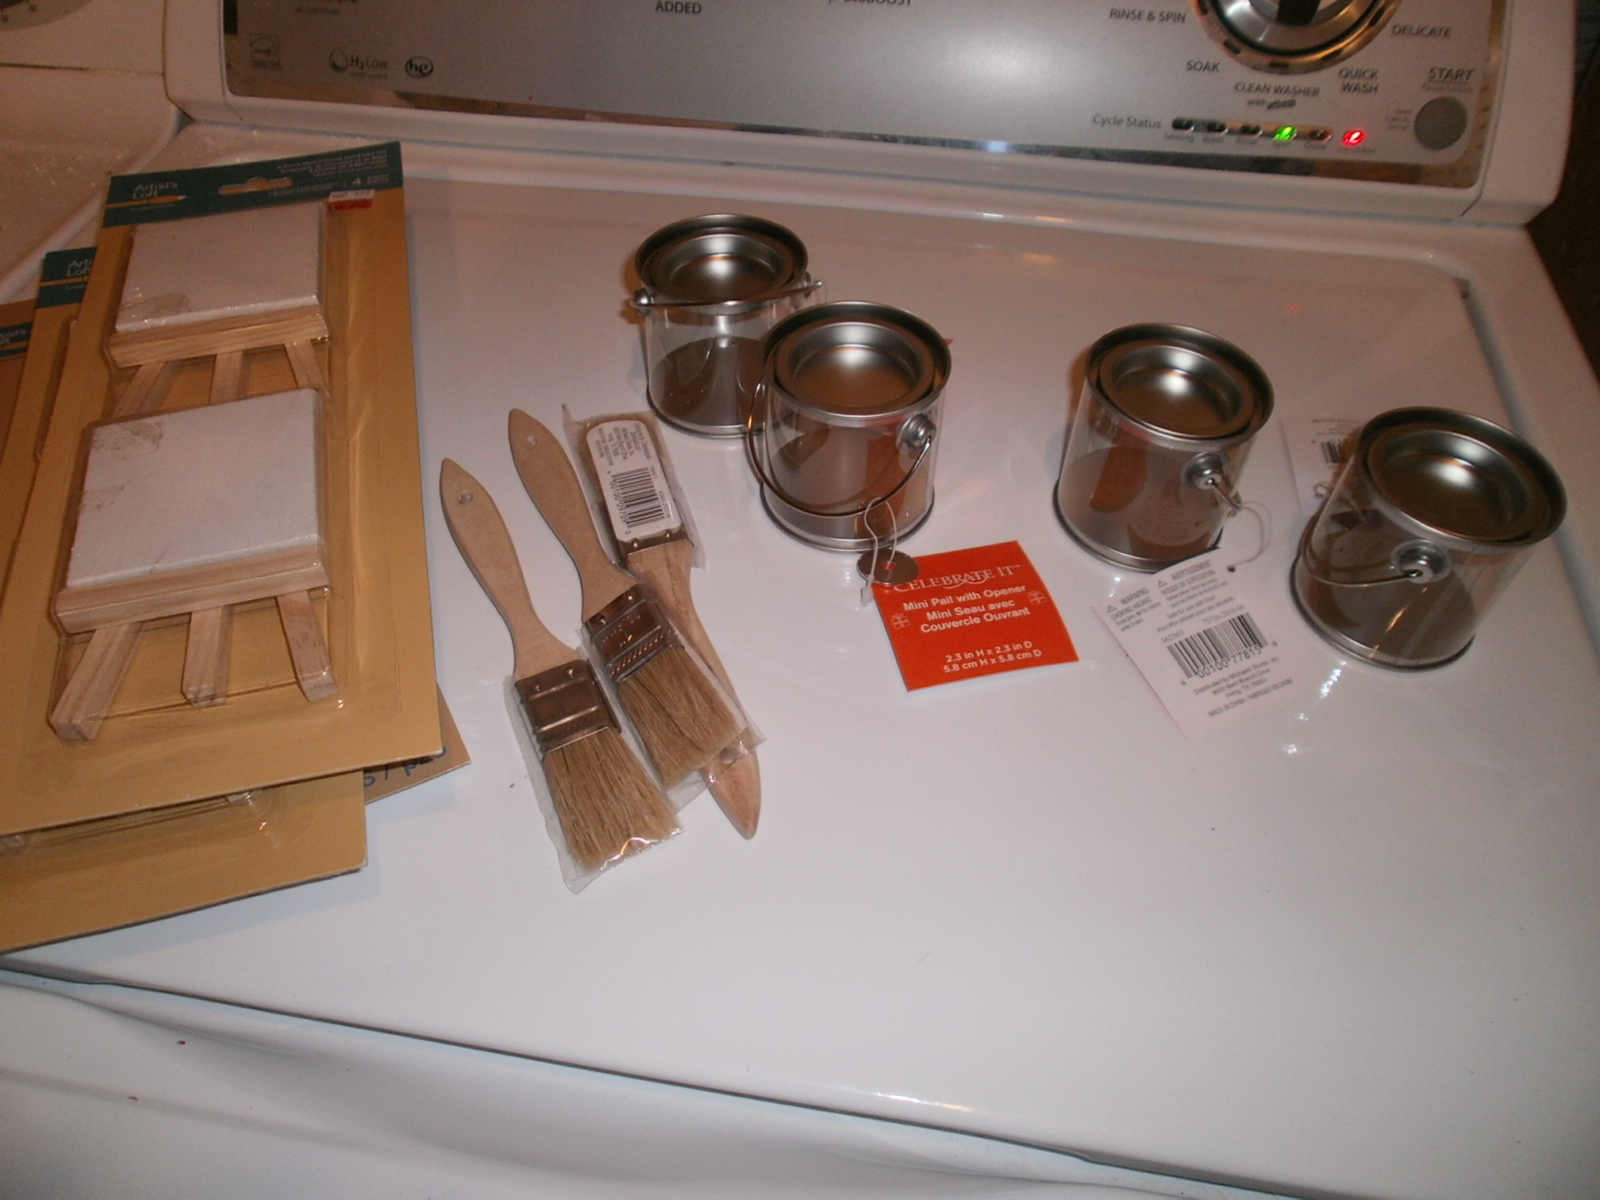 |
| We went to Michaels and found the paint cans, brushes and easels. |
 |
| The easels were a clearance score! I thought they would be cute place cards on the table with the girls' names on them. |
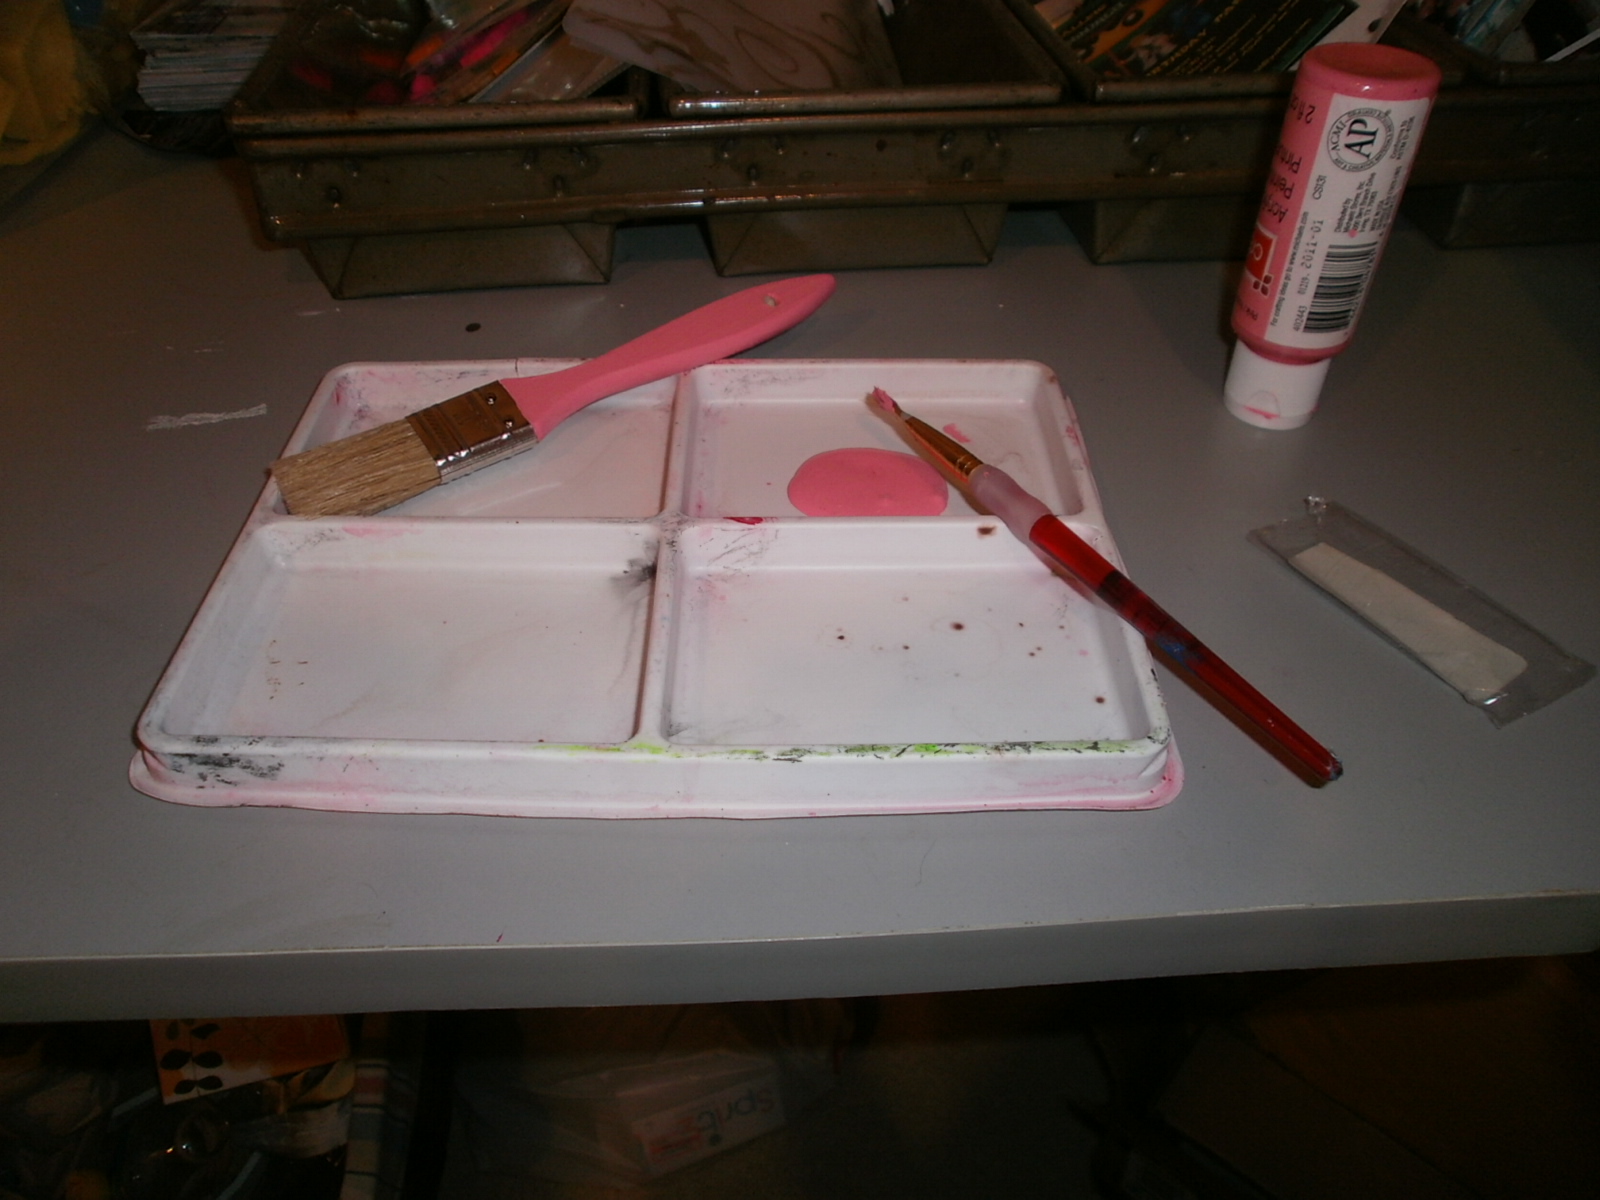 |
| We painted the wood paint brushes pink. |
 |
| We dipped the ends of the paint brushes in the paint as well and let them dry. |
 |
| My husband printed off these invites which look like paint swatches! It has the details of the party typed in each color. They read: "Purple, pink, orange and blue. Gabrielle wants to paint with you! It's Gabrielle's 7th birthday!" Then date, time, location, etc. |
 |
| I added pink paper to the inside of each paint can. |
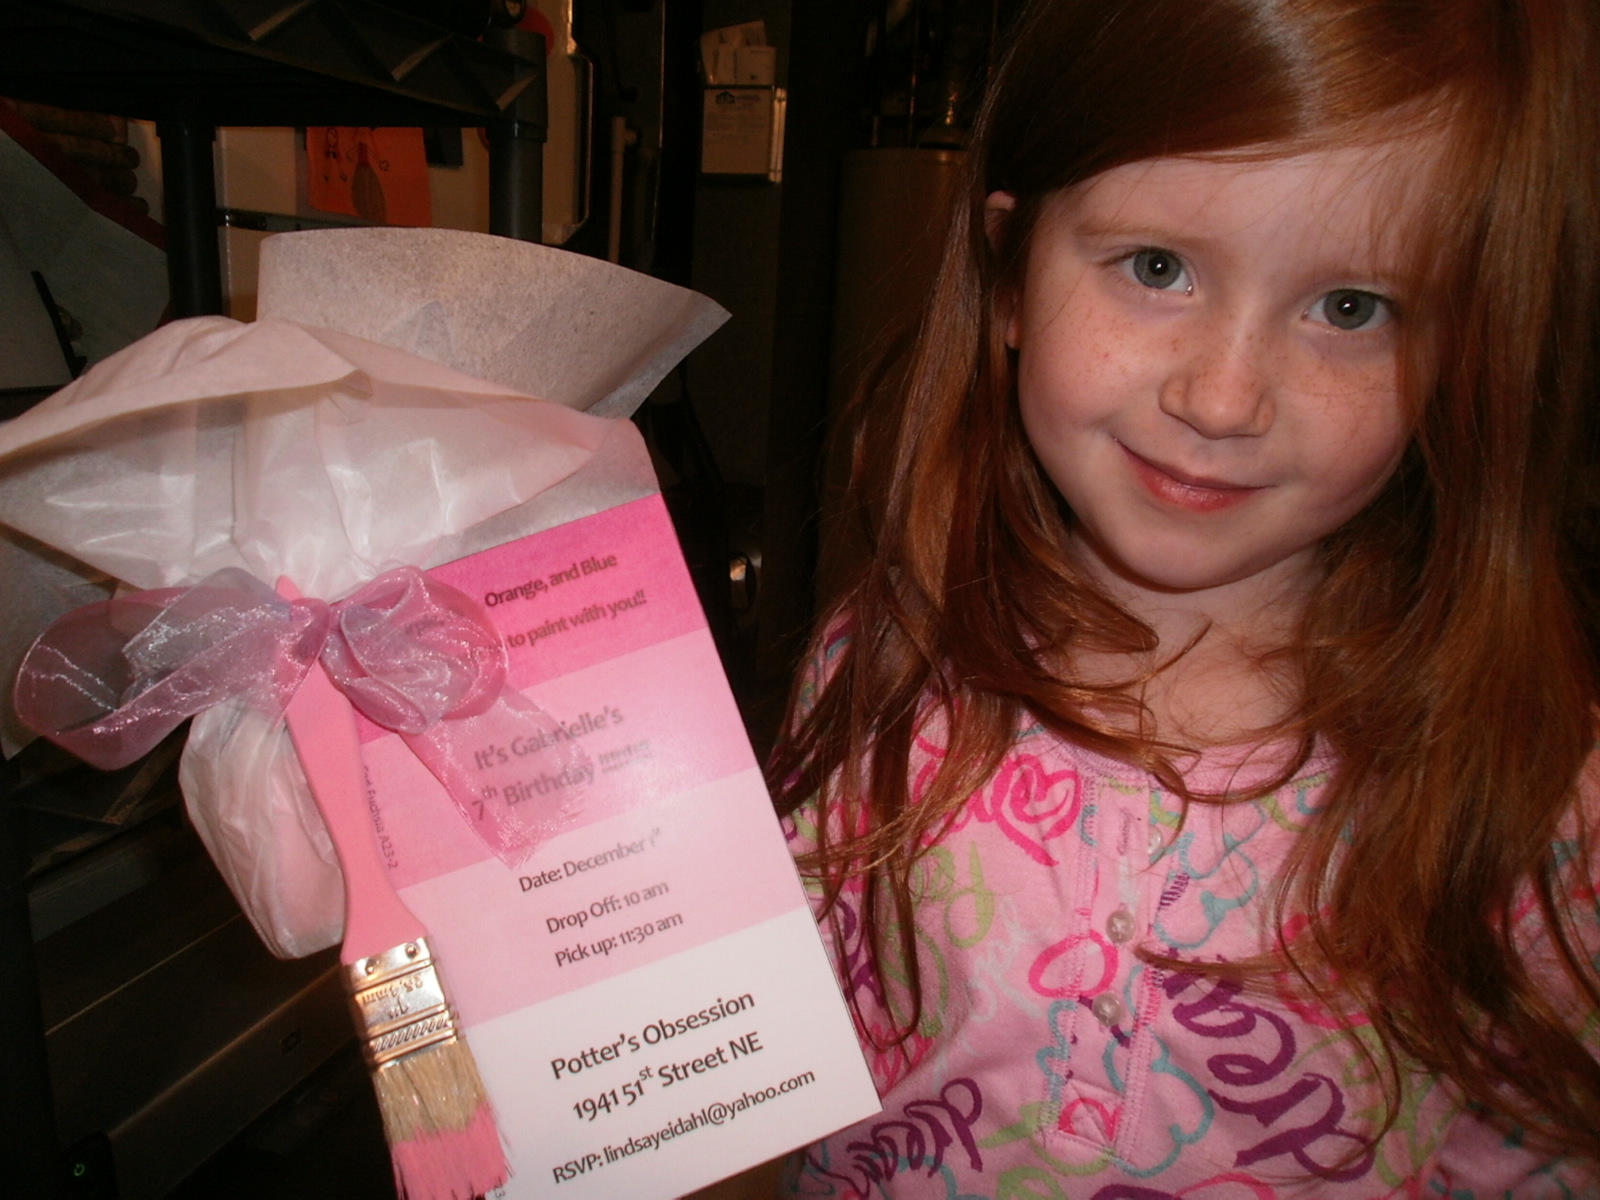 |
| We added M&M's to the paint can and then wrapped it up in tissue paper. We tied them up with a ribbon and added the brush and paint swatch to the outside! Cute!
Instead of a cake, I saw an idea once for cupcakes being paints. So, I had my husband cut out a painter's "pallet" out of wood and I painted it brown.

|
 |
| I then just made cupcakes and frosted them different "paint colors" and set them around the pallet! I think it turned out cute and it was so easy. Very easy to transport to the pottery place too! |
 |
| This is how the easels turned out. I painted their names on them and hot glued little plastic flowers on them. These acted as their place markers at the pottery place. |
I planned this party for 1.5 hours. I didn't know how long the girls would paint and I didn't want a lot of "extra" time because they couldn't really play in the pottery place. The girls painted for almost the entire time. We handed out some snacks and then cupcakes towards the end and Gabrielle was still opening presents when parents arrived to pick up! All in all it was a successful party and one that Gabrielle was happy with!
DIY Cabinet Redo -

Easy Santa Ornament Craft for Kids

I bought clear glass ornaments because the ideas and crafts you can do with them is ENDLESS! For this craft, I took the hanger off the top of the ornament and had the kids fill it with white beads (this would be Santa's beard). Then, I had them roll a small, square piece of red felt and we glued it so it would hold together (this is his hat). Then, I had them glue a white pom pom on the top of the hat. We glued googly eyes on the face and then I added the mouth, nose and rosy cheeks! Add a hook on the top (or a bent paper clip) and you have a cute ornament for the tree!
HO! HO! HO!
Merry Christmas!
Thursday, November 15, 2012
My Latest DIY Projects!~
I was heading to Target last week after I dropped the kids off at school and I ran into an estate sale! SCORE! I bought these three pieces and I am excited to start working on them. The pink "cabinet" piece has a drawer and the bottom door opens from the latch - down forward (if that makes sense)!!! It was such an interesting piece! The guys having the sale, told me that they were all in their grandmothers home so I know they are old! I love finding interesting pieces that are unique and not like other pieces around! LOVE THAT! Stay tuned and I will post pictures after I am done with them!


Wednesday, November 14, 2012
Kids Turkey Trivet Craft for Thanksgiving Table
We had white tiles left over and I knew I could come up with some creative way to use them. Since it is "turkey time", I thought it would be cute to have the kids make trivets for their Thanksgiving table this year! I painted the kid's hands and fingers different colors (dark brown for body and neck and then different colors on the fingers for the feathers). We put the hand print on the tile and I added feet, eyes, beak and the "gobble, gobble" (I never know what that thing is called). I used craft paint for this project so it would stick on the tile. I used some puffy paint for the eyes, beak, gobble and feet. When they were all dry, I took Elmers glue and painted the entire tile. This added a "protective" coat so hopefully the tiles will hold up over the years. On the back, I hot glued a piece of felt.


HAPPY THANKSGIVING!!
Easy "Wacky Mac" Turkey Project
I made a pasta salad last night with Wacky Mac and thought the colors of the pasta were perfect fall colors! So today, I thought we could incorporate them into a project! Wacky Mac Turkeys! I found a template online and cut out the shapes from thin cardboard. We added glue all over our turkeys and then put the "pretty pasta"on our turkeys! Fun, easy and perfect for Thanksgiving - food and turkeys!!
You need:
Wacky Mac or any colorful pasta
Tacky Glue (This is the best glue for little ones. It makes things stick instantly for the kids)
Turkey Template
Thin Cardboard or Paper/Cardstock (whatever you have)


You need:
Wacky Mac or any colorful pasta
Tacky Glue (This is the best glue for little ones. It makes things stick instantly for the kids)
Turkey Template
Thin Cardboard or Paper/Cardstock (whatever you have)


HAPPY TURKEY CRAFTING!
Monday, November 5, 2012
Great Tool to Teach Kids the States
My dad found these quarter collecting boards at a yard sale. He got them in a box of stuff. I was going through it and came up with a great idea! Each of the states has a circle punch out that you take out and replace with that state's quarter. On this particular board, the name of the state in written on the punch out. I immediately saw a game/learning activity for my kids! Pop out all the state's names and then have the kids learn where the states are and put them all back in the right place! What a great learning tool!!! We will be starting this one very soon!


DIY Dining Table and Benches on the Cheap!!
I have wanted a new table and benches in our dining area for awhile now. I have looked around and found that it was going to cost me way more then I wanted to spend and I wasn't getting everything I wanted and/or needed. So, why not revamp the table we have?? It is the perfect size for our space and it is a real sturdy table. The only thing was that I wanted to get rid of four of the chairs and get benches instead. All the chairs just seemed like too much in the room and I thought benches would be the perfect solution. So, my husband sanded the hell out of our table and got it down to the bare wood!!! I have a picture of my old table in a previous post.
Benches are EXPENSIVE! And, I was having a hard time finding the size we needed. So, instead, my husband made them! We got two benches for around $30 total! Wooo Hooo! Here are some pictures:


I stained the top of the table a dark color and I painted the legs a light gray color and then went over it with some brown to make it look aged.
 |
| This is our original chair (the table was the same color as these chairs). We had six of these around the table and it was just too much in our small dining room. So, my goal is to have the benches on either side of the table and then two different chairs on the end. I don't want the chairs to match. |
 |
| Another picture of the chairs we had. |
 |
| He made the benches and I painted the bottom the same color at the table legs. I stained the top of them the same color as the top of the table. |
 |
| I added the brown paint on top of the gray paint and then wiped it down with a cloth to give it an aged look. |


 |
| Once I get the other chairs out of there, it will look so much better! I brought the armed chair from our bedroom out and it looks good at the end of the table. I might luck out and only have to find one chair! A brand new table outfit for the dining room on the cheap!~ My kind of redecorating! |
I stained the top of the table a dark color and I painted the legs a light gray color and then went over it with some brown to make it look aged.
Thursday, October 18, 2012
Start a Little Booklet to Help Your Kids with Reading and Spelling


Saturday, October 13, 2012
Inexpensive Twist to Jingling Your Friends
We have always "Boo'd" our family and friends for Halloween, but wanted to start something for Christmas and found "You've Been Jingled" (you can make copies on www.beenjingled.com). It is pretty much the same thing as Halloween. Take this little note and some goodies to friends and families and ring on their door and RUN! You don't want them to know it was you. Then, they are suppose to keep it up and do the same thing with their family and friends.
The kids look forward to these activities each year. We added a little "twist" to ours. Along with some homemade cookies, we include a game for that family to play together during the holiday season! And, with all the great coupons out there for games, it is not that expensive to do. I just went to Target last night and they had 2 Elefun games on clearance for $4.98 and I used the $3 off 2 so that made them pretty inexpensive! You could even just give them a deck of cards and then print off the rules to some of your favorite card games to give with it. I think our lives get so crazy and hectic that to sit down and play a game anymore is sometimes forgotten. This way, a new game shows up at their door and we add a little note from our family: "Tis the season to spend with those you love. Here is a fun game for you to enjoy together! Happy Playing!"
Just a thought for the upcoming holiday season!
Tuesday, October 9, 2012
Shape/Halloween Learning Activity
The other day, we were going over our shapes and I decided that I would draw some different shaped jack-o-lanterns on our big piece of paper. The kids loved this and they had a fun time looking through our "pumpkin patch" (that is what I called the drawing of all the pumpkins) to find the different shaped pumpkins. We read a pumpkin story and then headed to the art table to do our activity (pictured below).

 |
| I took an orange piece of paper and make dots in a pumpkin shape around the paper. The kids counted all the dots first. |
 |
| Then, they took an orange marker and followed it along each dot. |
 |
| I told them to take their time so they didn't miss any of the dots! |
 |
| This is what it looked like when they were done. |
 |
| Then, to add more "shape" review, I had black triangles cut out and a rectangle for the stem (and of course a mouth). They took their shapes and glued them to make their jack-o-lanterns face. |
 |
| Aren't they cute! And, it was a great learning activity as well! Love those! |
Subscribe to:
Posts (Atom)