Tuesday, May 29, 2012

Old Door Repurposed to Make Corner Shelf


I rescued this old door from a local thrift store. It was $10 and still had all of it's charm. The plate around the door knob was painted brass but you could still see all the character. They just don't make doors like this anymore. I had a before picture, but since I have switched out computers, I have lost some of my pictures. Anyway, my husband cut the door right down the middle - from top to bottom. He used some "L" brackets on the back to "hinge" them together. Then, he added the shelves on the inside. I painted the entire thing out in a creamy white color and then went back in and sanded around the edges to make it look "worn". We had an old door knob in the garage that fit the door handle perfectly! I think that final product is so cute!


Back of shelf

Finished shelf

Rescued Chairs Make Perfect Planters For Yard!


My dad knows that I L-O-V-E refinishing and repurposing old furniture. So, when he saw these four chairs sitting by the curb to be thrown out, he snatched them up for me! 


I spray painted the chairs some fun colors.
 

I removed the seats entirely.


I added some pots that I planted plants in.

These chairs have added a lot of character to our yard!

Wednesday, May 23, 2012

Upcycle - Old Garage Door into Message Center


This was our old door off of our garage. There was a window on the top of it (of course I forgot to take a picture of it before my husband cut it in half). He cut the window part of the door off, which left the bottom part (with those fabulous panels!!!). I also had him even out the very bottom of the door so it matched the top part that he cut off. The panels on the door are what got me excited about this old door!!! I saw this bottom half as a message board! I cleaned the door and painted the entire thing a fun, spring green color. I painted each panel with chalkboard paint. I would like to add some hooks to it for keys and/or purses, etc. I think this would be so cute in any mudroom/entryway/kitchen. I will post a final picture once I am totally done with it, but it is fun to see what can be done with things that were going to just be trashed!


Fun May Day Basket or Gift for Any Occassion

I painted this wooden tool box a fun green color and then stenciled the letters on the front. I wrapped the handle with some yarn I had.

I filled it with some May Day goodies for my sister and her family (her Scrabble coasters that I blogged about before fit too!). It was a cheap, easy and homemade take on a May Day basket! I wish I had more tool boxes to use for more gift giving.

Upcycled Organization for Hair Assesories

I bought this organizer at a yard sale for $3. I loved the 50's flower pattern it had on it and that the box itself is metal! I thought it would be great to use for my daughter's hair assessories!

The drawers were all plastic. I cleaned them out and lined all of them with scrapbook paper.

Then, to make the fronts of the drawers look cuter, I hot glued some scrapbook decals on them.

All the drawers done.

It fit her bows perfectly! They are now organized, and we can see what we have each morning when I am doing her hair!!!

Yarn Art - Great Project for Older Kids!

We started with a foam board. We put glue on the bottom and used green yarn to make the grass.

Closer look at the grass.

We then added some green stems.

I thought it would be easiest to make circular flowers, but the kids wanted to draw some that they would then "fill" with yarn. She was drawing a tulip for this one.

Here she drew the circular shape, but added some petals.

This was one of her finished flowers.

We started with the circular pattern on the inside.

She loved the look of it that she decided to cover the rest of the it with a different color in the circular pattern. Trying to do the petals and the tulip turned out to be pretty hard for their little fingers.


I took a picture of the final board, but I must have erased it. It turned out really cool. She had at least six flowers on it! I thought this would be fun to do for adults too! You could make some pretty amazing artwork!!!!! The possibilites would only be limited to how much yarn you had. Happy yarn crafting!

Tuesday, May 22, 2012

Rainbow Caterpillar Behavior Chart

I wanted to come up with a "behavior chart" this summer for the kids. I thought a rainbow caterpillar would be cute. I cut out circles of each color of the rainbow. I made his head white. Each morning, I will have a trivia question for the kids to answer and then they also have to find our "Benny the Bee" (something I started last summer that they keep begging to bring back. I just colored a picture of a bee and I hide him around the house each night. Then, each morning they find him). When they have done both of these things, they need to put their clothes pin (they will each have a clothes pin with their name on it) on the caterpillars head (start). This is where they will start each day and depending on how they behave, they will move their clothes pin accordingly.

This is what I made the colors represent:

White = Start
Red = STOP! This means they have not had a good day at all
Orange = WARNING!
Yellow = Slow Down
Green = Your headed in the right direction
Blue = Keep up the great work
Purple = WOW! You are doing fabulous!
Pink = OUTSTANDING!

I like this idea because it gives the kids a "visual" on how they are doing. They will want to work hard to watch their pin climb the caterpillar.

It is a magnetic wall under the caterpillar and Mr. Potato Head has invaded that space at the moment!

Monday, May 21, 2012

Summer Family Activity Jar

Along with my "Boredom Jar", I decided to come up with a "Summer Family Activity Jar". This jar is going to be filled with slips of paper that have activities we can do as a family this summer.

Here are some ideas I have come up with so far:

  • Bake a sweet treat
  • Rent a movie or game
  • Weed the garden
  • Star Gazing Night
  • Make homemade Popsicles
  • Catch fireflies
  • Make a healthy smoothie
  • Walk to local ice cream shop for a cool treat
  • Have a picnic
  • Go for a walk
  • Bike ride
  • Design a family flag
  • Write a menu for tomorrow's dinner
  • Visit Farmer's Market
  • Explore local park trails
  • Try a local restaurant
  • Visit the library
  • Boce ball
  • Plan a play date with friends
  • Go for a treasure walk
  • Pick up trash in neighborhood
  • Movie and popcorn night
  • Campfire night
  • SMORES
  • Sleep on three seasons porch
  • Make fresh lemonade
  • Visit a new park
  • Go rock hunting - search for unusual rocks
  • Splash pad
This is all I have right now. I will keep thinking and writing down activities for the summer. I would love to hear what your favorite family activities are!!

Summer Boredom Jar

I am dreading the summer days when I am going to hear, "I'm bored!" So, this year, I have invented the "Boredom Jar". I have been thinking about this for the past couple of months. Whenever I come up with an idea, I write it down. My goal is to fill the "Boredom Jar" with so many ideas and things to do that it will make the cry, "I'm bored" a little less daunting for me.

Here are some of the things I have come up with so far:
  • Make a tent
  • Play hide and seek
  • Make costumes or put on dress up clothes and put on a play
  • Write a menu for what you want for dinner
  • Make a fairy house outside
  • Search for fossils in the rocks around our plants
  • Write a story about a summer vacation
  • Draw an ocean picture
  • Make a Lego creation
  • Find 10 different leaves
  • Set up a tea party
  • Make up a dance
  • Read a book
  • Sidewalk chalk
  • Play a board game
  • Come up with an art project (or ask me for one to do)
  • Find things that start with the letter "t"
  • Play restaurant (design menus, set the tables, name your restaurant, etc.)
  • Play beauty shop
  • Write a summer letter to Santa (he is not so busy right now)
  • Find your way through a maze (I have a book of mazes)
  • Do a worksheet (I have plenty of these on hand for the kids to do over summer)
  • Make a rock sculpture
  • Invent and design a new toy
  • Invent your own game
  • Ride your bike
  • See if mommy needs help with anything (I am thinking about adding this a few times so it gets picked more than once)
  • Find five different bugs
  • Make a crazy hat
  • Clean your room
  • Try to catch a butterfly
  • Go to the creek (near our house)
  • Play a card game
  • Play a computer game
  • Write a story about your favorite toy
  • Design an obstacle course
  • Find something outside for each color of the rainbow (red, orange, yellow, green, blue, purple, pink, black, brown, gray, white)
  • Shoot 50 baskets
  • Water the plants
  • Write a scary story
  • Pick up sticks and put in fire pit
  • Measure the following items: blade of grass, stick, leaf, flower petal, your thumb, rock, your foot, three items of your choice
  • Look and see what the clouds are shaped as - what do you see?

I will still be coming up with ideas until the summer months and beyond. I think I have a good start, but you never can be too prepared! I hope this list helps you this summer!! I would love to hear what your ideas are and how this works for you!

Upcycled Tool Box to Craft Carrier

These little carriers are so popular! I see them everywhere. I picked this one up at a yard sale for $2. It was an ugly color so I spray painted it yellow. I then used it to house all my glue and glitter at my craft table. Cute and functional!

Redecorating Son's Bedroom

It has come the time to redo Landen's bedroom (or at least, I wanted another excuse to redecorate and have another project going on at the house). My dad built him his loft bed when he was four and Landen has outgrown it (and a friend of a friend has been begging me to sell his loft bed so her son can have it........ so that also helped push this project along).
This is the loft bed my dad made for Landen when he was four.

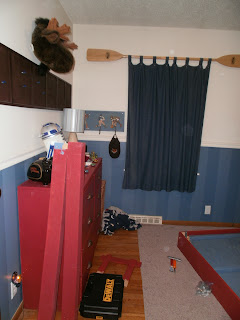
This is a before picture of his room as we were taking apart the loft bed.

Another before picture looking at the closet.

Before picture (we were able to save this dresser and put it in the closet for more space).

I chose a pale gray/blue color for his room to lighten is up a little bit.

We reconfigured his closet and built shoe cubbies on the right hand side and put his dresser in their as well. I painted it a darker blue and then painted a star on the front of it using the color of the walls.

I was going to have open cubbies as the base of his bed, but since we were able to keep his dresser, I decided against it. I knew he was going to have enough storage space. My dad built this bed for him and then we bought stock cabinets (that have four drawers each) to fit on each end of the bed.

This is how the closet turned out. He has plenty of storage for hanging clothes and also has space for his shoes where he can see them. The dresser fits right in there for all his folded clothes. He also gained eight drawers with the cabinets on the sides of his new bed.


I stained all the wood a dark color. I love how it turned out. He has plenty of storage in there. I still need to find a curtain and also a rug for his room. I also want to change out his bedspread, but that might take awhile so I wanted to get this post out sooner than later. I will try and post more pictures to this post when we get it totally done.

This picture gives a better light. I think I am going to repurpose this old ladder in his room to hang coats on. I want to add some hooks to it and then he can hang things on it.


This room was pretty easy to do and we didn't spend tons of money. I hope this gives you some ideas for your little one's room! Keep me posted and let me know how your decorating journey is going!

Fun Teacher's/Helpers Thank You Gift

I try to come up with fun thank you gifts each year for the teachers and helpers at my kids' school. This year, I was at Dollar Tree and came across these cute totes! I couldn't believe they were only $1! They are made out of strong material and you can easily personalize them! (I am hitting myself for not buying a lot more. A lady came in behind me and asked which aisle I got them in. She bought every last one of them!!!!).

They came in all different colors too!!!


Inside the bags, I came up with different "gifts" to say thanks. Attached to each gift, I put a tag on them describing what it was. This is what I had in this particular bag (which was for my daughter's fifth grade buddy).
  • 8 pack of Sprite (the little cans) - the tag reads, "You were the sp'rite' choice for me"
  • Pocket size Kleenex - the tag reads, "Thank you for getting me Kleenex when I needed them at church"
  • Strawberry Chapstick - the tag reads, "I couldn't have 'picked' a better buddy"
  • Box of Junior Mints - the tag reads, "You were 'mint' to be my buddy"
  • Box of Sweet Tarts - the tag reads, "Thank you for being such a sweetheart"
  • 2 packs of Trident Splashing Mint gum - the tag reads, "Hope you have a 'splashing' summer"
  • Pocket size hand sanitizer - the tag reads, "Thank you for always holding my hand"
  • Bag of Swedish Fish - the tag reads, "You were o'fish'ally the best 5th grade buddy"
  • Water Bottle with Snapple single-serve tea powders inside - the tag reads, "Here's to a refreshing summer"
  • Small notebook (that we decorated with scrapbook materials) - the tag reads, "Everyone should take note on what a great buddy you were"
  • Beach ball - the tag reads, "Thank you for playing dodge ball with me"
I had my daughter write her a thank you card as well and we stuck a pink felt flower (in picture - got them out of $1 bin at Michaels) to the card. I think they came out really cute and they are all things that they can use. Hopefully this helps you get your creative juices flowing. I would love to hear how yours came out!!!

Yard Sales a Success Again!


I went to yard sales this past weekend and came across this old sled for $10! I loved the look of it and the design on it! It didn't look like a sled to me. The woman that was selling it said she had had it for 25 years and her husband has always hated it, so it was time to let it go. I was so happy (one person's junk is another person's wall art)! As soon as I saw it, I pictured it hanging on the wall in my son's newly decorated room!

I think it looks perfect in there!!!

Wednesday, May 16, 2012

Upcycle Old Ladders

I think that old, wooden ladders look so cool and have so much character! My grandpa had a few in his old house that my husband and I saved from the dumpster. With one of them, we put it inside our three seasons porch. We hung it right inside the outside door and added some old wire baskets to the rungs. It has become a great "catch-all" space for shoes, flip flops in the summer and hats and mittens in the winter!!!

CUTE - Handmade Flowers for Mothers Day... or Any Day

I found this recipe for "glue" to make yarn flowers. The recipe is 1 cup water to 1/4 cup corn starch. You cook that over medium heat until it is combined and glue like. If it is too think, just add more water. Make sure you keep stirring it while it is cooking. I cooked it for about 8 - 10 minutes. When it is done, put it in a bowl and let cool. Meanwhile, cut yarn in to 12" long pieces. Put cookie cutters (I used heart shapes and flower shapes for ours) on a piece of wax paper. Dip the yarn pieces into the cooled glue and set inside the cookies cutters. Make sure you have an even layer and all corners are covered. Take the cookie cutter off and repeat this process as many times as you have yarn for! You can either let the "flowers" set over night or put them in a warm oven (I just set my oven on the "warm" setting) for 2 hours to dry (put them on a cookie sheet). When they were done, we added wooden skewers for the stem and glued on buttons for the middle of the flowers. I also added felt pieces to the backs of them to make them look more "finished". To make our vases, we wrapped bottles (I used empty beer bottles) with yarn! Cute handmade gift that is easy and fun for the kids to make!